Foxy Green Foxbody Build

I made the crazy assumption that the trans bolt holes wouldn't get it perfectly centered with bell.

I have the low profile 12pt 5/16 head with Allen option. I have custom ground wrenches and sockets ground so thin they break. I have a cutoff Allen wrench too. It's a real fun time
The tranny should be tight in the bell. Does your bell have spacers for the tranny bearing retainer size?

Sounds like mine. Have you tried a cut off ball end in the bolt and turn it with a wrench?
Would a small indent in the header help?
 
Bore some holes through your inner fenders that are large enough diameter for a long 3/8 extension to go through and use a ratchet & socket.
Same goes for plugs.

I have to do the trans and engine as one on the install. I've made several posts about the offset dowels and bellhousing not perfectly keeping the input shaft within spec. People want to argue about it, but I know what my situation is and has been. Also, the headers in the engine bay aren't the problem. It's the one single click of a wrench at a time trying to turn the header bolts. It's an absolute shit show. The new heads have 2 different patterns for header flange bolt up, w8de and narrow. I've debated welding new flanges on to make my life 1000% easier.

I made my own brake lines. If I could do it all over again, I would not have run them along the k member to hide them. Looks slick, but that means I can't drop the k member to do any engine work or to get the engine installed easier.

Those two things along would save me a full day AT LEAST when pulling the engine or dropping it back in.
 
Maybe when you are pulling in out of the garage this time,you refrain from giving us the finger like last time, and good karma will come your way.;):ROFLMAO:

You're more than welcome to make the drive and flip off the bullet from the passenger seat this time. Load that car up and hit the Friday night races here while you're at it
 
Maybe when you are pulling in out of the garage this time,you refrain from giving us the finger like last time, and good karma will come your way.;):ROFLMAO:
Boooooooooooooo.............

Get to it man!
 
Ma
You're more than welcome to make the drive and flip off the bullet from the passenger seat this time. Load that car up and hit the Friday night races here while you're at it
Made my share of passes at Lancaster dragway years ago. Not going back.
 
Last year.. or maybe 2 years at this point. I fought the headers not having clearance to the clutch fork. I thought this was due to 7oclock clutch position with the t56 kit. I was under the impression that a t5 had a 9 o clock clutch position.

I bashed one of the primaries, tried cutting the clutch fork shorter, and it was still rubbing. Not only that, the cable was at a weird angle when in the bellhousing hole.

I also pushed the midpipe tubes apart. And when bolted up, it put tension on the headers, enough to gain clearance.

Long story short, that was a waste of time and the wrong way to go about it.
 
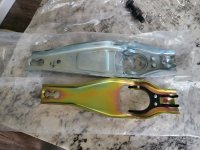
The fork they send (American powertrain) in the kit is for 94-04 and longer than the foxbody fork by about 1.25"

20250814_170300.jpg

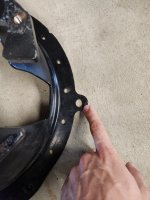
I have enough room to redrill the bellhousing and everything will line up and give me more clearance

20250813_092920.jpg
 
At least there's a solution. Mopar? Not so much LOL
 
Installing a new ACC carpet. It comes with no holes. Flip it over, you'll see where holes are supposed to be.

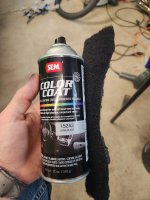
Anyways, after you cut to fit around subframe connectors and roll bar, use heat gun to melt the edges. Real quick pass, dont dwell or you fuck it up. Afterwards if you have a matching can of SEM color coat, hit the back side around the areas you cut. This will hide any white fibers or glue to make it look like it was seamed20250821_110539.jpg
 
Just for shootin' the shit...

I think SEM is the only company that says "hold the can upside down while shaking".
It just makes sense to me.
I go the whole OCD way and hold the can every single angle while shaking it and do it for about three minutes.
 
Got the seats back from cleaners. They smell nice, but no better cleaned than what I would have done. Oh well, learned a lesson.

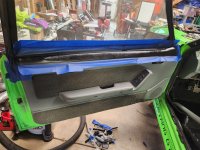
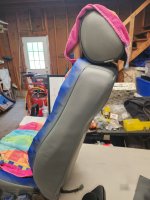
Painted the vinyl on the seats. Now everything matches. Dash, trim, seats, roll bar

20250822_104526.jpg
 
Today's work

Rpm switch is installed
Back up lights plug wired in
Reverse lock out plug wired
Carpet is vacuumed
Seats painted/dyed

Parts Ordered today:
Fire extinguisher mount for rear hatch
Two step
6 gallons of 10w40


Next up, I think:
Two step wiring
Carpet install
Dash trim install
Seats installed
Fix fuel pressure isolator
Test carburetor
Test fit headers with new clutch fork
Fix as needed
Install engine
Rework exhaust
start it up
seat the rings
Change oil
Do burnouts
Celebrate no glitter
Take to grudge night and make a few gentle passes to see how it feels
Buy a trailer
Get the fuck out of ny before the snow arrives
 
Today's work

Rpm switch is installed
Back up lights plug wired in
Reverse lock out plug wired
Carpet is vacuumed
Seats painted/dyed

Parts Ordered today:
Fire extinguisher mount for rear hatch
Two step
6 gallons of 10w40


Next up, I think:
Two step wiring
Carpet install
Dash trim install
Seats installed
Fix fuel pressure isolator
Test carburetor
Test fit headers with new clutch fork
Fix as needed
Install engine
Rework exhaust
start it up
seat the rings
Change oil
Do burnouts
Celebrate no glitter
Take to grudge night and make a few gentle passes to see how it feels
Buy a trailer
Get the fuck out of ny before the snow arrives
Did/are you taking it to the dyno ?
 
Back
Top